![paiger-logo-white (1).png]](https://help.paiger.co/hs-fs/hubfs/paiger-logo-white%20(1).png?height=40&name=paiger-logo-white%20(1).png)
- Instruct Paiger to execute the initial integration. Our team will need to integrate your Bullhorn instance with Paiger. To do this, you will need to share with them your Bullhorn Client ID and Secret
- Admin Account: In order to complete the following steps, you will need to be an admin on your company’s Bullhorn account or have enhanced user permissions. The setup requires access to the "Admin" section and "View Layout" options, which are not available to a standard user
- Install the Paiger Chrome Extension: The Paiger Google Chrome Extension must be installed by all users who will be using Paiger’s Bullhorn integration. This extension is required to ensure users have full Paiger functionality.
- Paiger Account and Licences: In order to utilise the Paiger functionality within your Bullhorn account, Bullhorn users will require a Paiger account. Users without a Paiger account will see the tabs in their view, but will not be able to access them.
- Log in to Bullhorn through your Paiger account: The first time someone logs in to Paiger in Bullhorn, they will need to do so through Paiger. To do this; Click on your name in the top right > Integrations > Bullhorn. You will then be taken into Bullhorn to complete your integration.
With these steps completed, you are ready to start adding the required tabs to your candidate, company, contact and job entity.
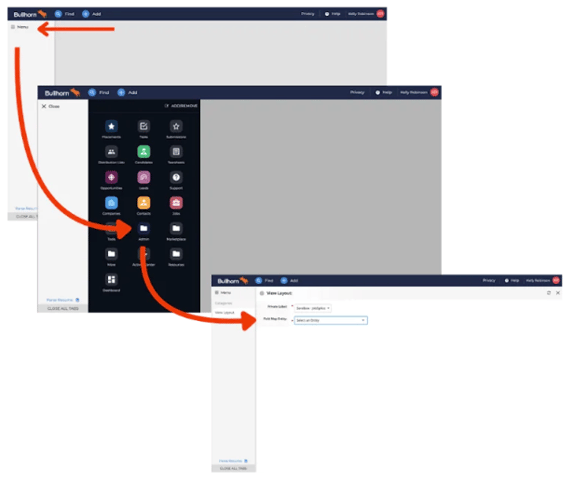
Upon logging in go to Menu > Admin > View Layout. From the dropdown, find the entity that you wish to add Paiger to.
From the View Layout screen, select the chosen entity from the Field Map Entity drop-down.
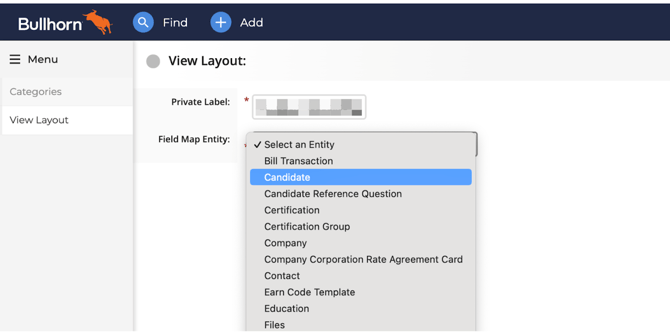
You will need to do this for 'Candidate', 'Company', 'Contact' & 'Job'
Each Bullhorn account has up to five job entities, typically used to differentiate between contract type eg. perm, contract, temp. We recommend adding these to all the job entities.
Adding the Paiger Tabs
From the entity View Layout, click on the Custom Tabs tab.
From here you will need to add your new tabs. To add these, click “Add New”.
The details for each tab you need to add are listed in the table below.
The below table shows the tabs to add for each entity:
| Candidate | Company | Contact | Job |
| Spec CV (Paiger) | Research (Paiger) | Outreach (Paiger) | Market Intelligence (Paiger) |
| Post (Paiger) |
Vacancies (Paiger) |
Find Candidates (Paiger) | |
| Outreach (Paiger) | Outreach (Paiger) | Write Job Advert (Paiger) | |
| Vacancies (Paiger) | Post (Paiger) | ||
| Outreach (Paiger) |
|
Tab Name |
URL |
|
Spec CV (Paiger) |
https://crm.content-app.com/find_bullhorn_user_in_contentapp_api/action_mycandidates_method_default |
|
Post (Paiger) |
https://crm.content-app.com/find_bullhorn_user_in_contentapp_api/action_social_method_start_page |
|
Outreach (Paiger) |
https://crm.content-app.com/find_bullhorn_user_in_contentapp_api/action_links_method_default |
|
Vacancies (Paiger) |
https://crm.content-app.com/find_bullhorn_user_in_contentapp_api/action_vacancies_method_default |
|
Research (Paiger) |
https://crm.content-app.com/find_bullhorn_user_in_contentapp_api/action_prospector_method_start_page |
|
Market Intelligence (Paiger) |
https://crm.content-app.com/find_bullhorn_user_in_contentapp_api/action_vacancies_method_get_market_intel |
|
Find Candidates (Paiger) |
https://crm.content-app.com/find_bullhorn_user_in_contentapp_api/action_boolean_method_default |
|
Write Job Advert (Paiger) |
https://crm.content-app.com/find_bullhorn_user_in_contentapp_api/action_writer_method_default?post_type=job |
Select the user types you would like to have access to this tab. Please be aware that you can select multiple user types for each tab. If you’re unsure which types to include, you can check the user types assigned to each user in the Users tab accessed by Menu > Admin > Users, or an alternative tab.
Example of completed tab:
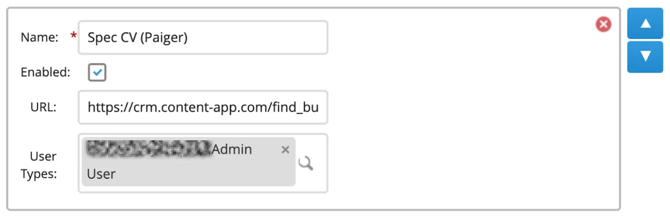
You can change the order in which these tabs appear by using the up and down arrows.
Once completed, click “Save”.
You will need to repeat this for each tab within each entity.
Troubleshooting
If after testing you find that the user you tested with is not able to use the Paiger tabs we suggest the following actions:
- Check the user you are testing with has a Paiger licence. Only users with a Paiger licence allocated to them will be able to access the Paiger tabs.
- Check that the user you are testing with is in one of the allocated user groups that you added when setting up the tabs.
If, having checked the above, you are still experiencing issues please reach out to Paiger support who will be more than happy to guide you through your problem - support@paiger.co